The endless polytunnel
I do love a trial and usually have something I want to try out each year. In the past I have looked at sowing seeds and the best ways to do this and when to use each method. This year I am trialling something completely different. Last year my tomatoes were a bit indifferent in places in the polytunnel. That was partly due to ants, which are a real problem and I can’t find a way to get rid of them, and very dry soil. I have tried everything to get rid of the ants, and I mean everything my friends, from boiling water to nematodes. And NOTHING works!
 Many years ago I read Eliot Coleman’s book The New Organic Grower and instantly wanted his moveable polytunnels. He designed and built them himself and they run on tracks and have 3 different places they can settle. I don’t have the know-how or desire to build my own but I now have a temporary tunnel which I can move around.
For about 18 years I have had a hooped tunnel frame without a cover on my plot. I planted an apple tree inside it thinking I would move the frame soon but of course, never did. This winter I pruned the tree hard so that I could get the frame over it and then walked it to its new site. It has had go where it would fit rather than where it would look best so it is in an unusual place but it is in. The polytunnel companies are all taking a long time to send items out, understandably, and I couldn’t wait for 6-8 weeks so I bought some cheap plastic from Amazon for £3 to cover it with. It will do for this year.
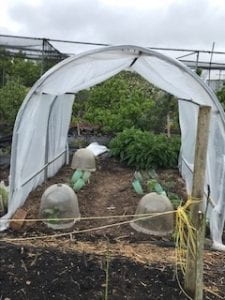
 The thing that is different about it is that it has no ends. I know! What was I thinking? Actually, I was thinking about the fact that it is the wet that I am really trying to keep off the tomatoes and probably provide a bit more heat than our ‘normal’ summers. (Not sure what a normal summer is nowadays!) The tunnel’s side is facing the prevailing winds, offering some protection but I can not deny that it is airy inside. And that the plastic blows around a bit because it was too stretchy to put on tightly.
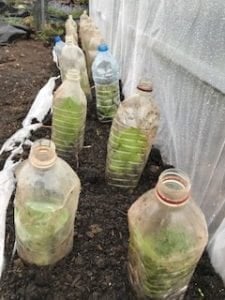
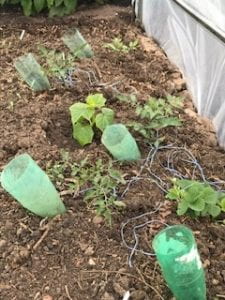 Inside, I have planted tomatoes and a cucumber in the same way as my other tunnel. This means bottles sunk to water and string underneath the rootball to train the tomatoes up as they grow. At each end, half in and half out, I have two courgettes under plastic domes because it is a bit early for them to be out yet. The downside might be slugs and snails. The tunnel is near the patch of comfrey and there must be hundreds of the little critters hiding under the leaves. However, the tomatoes that I planted out when it was really warm are growing well.
 Outside the tunnel, I have buried the plastic and then planted some lettuce in the ditch, covered in plastic bottles at the moment to protect them from things until they are big enough to cope on their own. They are growing well but need more frequent watering than if they were in the soil with no polythene underneath them.
So, this is my trial for the year. Will the tomatoes grow and fruit well? Will the endless tunnel be later than the one with ends? Can I use it for a second year in this place or will I need to move it after I have harvested the fruit, if there is any? If I want to move it, I only have to pull it up and move it to the side where I reckon I can fit it on twice more before running out of bed. Then I can bring it back to this patch. My very own mobile polytunnel.
I will keep you posted with updates. What are you trialling this year?
 These are made out of materials that are generally lying around the land but have a core of wood at the heart. The idea is that wood, leaves, twigs, compost soil and turf are layered on top of each other to create a mound which rots down slowly over time. Vegetables and shrubs can be planted into them and are reputed to perform very well.
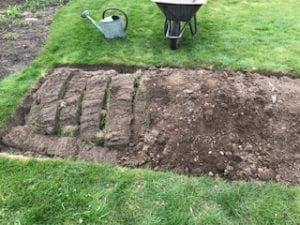
 You have to clear the grass and then dig down so that the trunk is buried a little bit. This helps it to act as a water soak and to be in contact with more soil which will help it to rot down. As a no-dig gardener, this part is proving to be difficult. It just feels wrong to dig and because I don’t dig, I have managed to rub blisters in several different places on my hands just removing the turf.